Categories
Computing Consumer

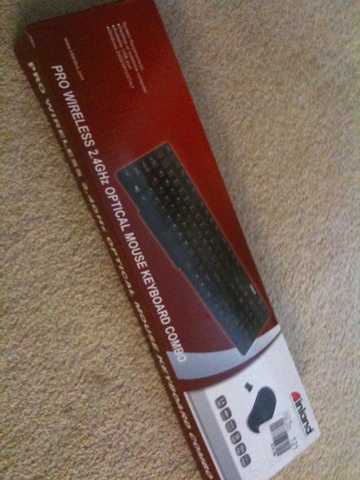
You get what you paid for: Inland Pro Wireless 2.4 Ghz Optical Mouse and Keyboard Combo

One of my Christmas vacation goals was to set up an old
desktop computer as a media center device (running Boxee). More on
that when I’m done with the effort. To control the machine I was
looking for an affordable wireless keyboard and mouse solution. I
found a cheap Inland combo at MicroCenter. It uses RF so it should
be able to work with the barely hidden computer. So I thought. And
for $20 it’s a deal. Well, you get what you pay for. On looks alone
the keyboard and mouse are handsome and the USB transmitter is of
the cool tiny kind, and barely visible. Touching the devices gives
the right impression. Cheap and flimsy. To get to the tiny
transmitter you need to remove the battery cover from the mouse and
pull it out of a dedicated compartment. Quite nifty except for the
fact that the mouse cover is flimsy and does not pull off gently.
Eventually everything was in place. What makes this a bad accessory
is that it fails to do either of its jobs. The keyboard barely
manages to send key strokes to the computer. Even a 4 year old
typing with a single finger was too fast. And that’s when the key
strokes even registered. Normally something was off with the
connectivity. Changing batteries did nothing to improve matters.
The mouse did not fare any better. It did not ‘wake’ from wait
state until it was moved roughly and even then lost reception. Not
very helpful. Clearly this goes back to the store. Since it did not
harm the machine it is not the worst. But useless overall.

Share
Categories
Computing iphone

How to export contacts from a Nokia device to Gmail

I got my wife an iPhone this week. She used my old Nokia N95-8GB when we both decided we were fortunate enough that we could afford to get her an iPhone. The (virtual) keyboard and overall capabilities of the device just overwhelm compared to the Nokia.

Still, her contacts were on the Nokia and needed to be moved to the iPhone. Since her new iPhone uses micro-SIM cards, the Nokia's full size SIM could not (easily) be removed and moved to the iPhone. Software was our hope.

Google provides synchronization with mobile devices using the Microsoft Exchange ActiveSync protocol. To achieve that, the Nokia is expected to have Nokia's Mail for Exchange application installed. The Nokia had version 3.0.0.0 of Mail for Exchange (MfE) and sadly failed to sync no matter how many times I tried. Ironically, Nokia has a Sync application that works with their Ovi Contacts website. Sadly, Ovi Contacts does not appear to have an export capability for the contacts it holds. 

So how do you do it?

My N95-8GB came with a software application on the CD called Nokia Nseries PC Suite. I believe it is similar to the Nokia PC Suite distributed today. I installed the application on my PC (no Mac version, sadly) and connected my phone. I started the application, which detected my device. I then clicked the tools button, and finally 'Nokia PC Sync'. PC Sync will then ask you if you wanted to synchronize your phone's calendar and contacts with Outlook, Outlook Express (which relies on Windows' Address Book installed on any Windows XP and newer machine) or variations of Lotus Notes. I chose Outlook Express as I do not have Outlook installed. The application then proceeded to ask me which address book to export to and then once confirmed, the application synced. 

Once synced, I disconnected the phone from the computer and opened Address Book. The application immediately showed the new contacts imported from the phone. Under the File menu, Address Book has the ability to Export. Select 'Other Address Book' and then select 'Text File (Comma Separated Values)'. Pick a location on your computer and Address Book will create a .csv file there.
Update (8/19/2010): Apparently Windows Address Book on Windows XP, at least, does not export mobile numbers in its export function. To achieve this feat you need to install Windows Live Mail. Windows Live Mail required me to uninstall a previous version of the Windows Live Essentials suite I had already but after doing that, it installed fine. Windows Live Mail comes with what apparently became Windows 7's address book – Windows Live Contacts. Windows Live Contacts, in turn, reads Windows Address Book's files but is able to let you export the correct fields – most importantly, mobile phone number.

To do that, open Windows Live Mail and select 'Contacts' from the application bar on the bottom left hand side. The contacts window will open. Now, press ALT+M or click the menus button. Select 'Export' and 'Comma Separated Values (.CSV)' from the sub-menu. A window will pop up asking you for a file name and location for the exported contacts file. Select one and click 'Next >'. You will now have the option to select what fields or contact attributes you would like to export. Scroll down the list and make sure that the 'Mobile Phone' field is checked. Click 'Finish' and the application will create the CSV file you need in order to import your contacts to Gmail.

Finally, go to Gmail and log into your account. Click 'Contacts' from the menu on the left. Your contact list will appear. On the contact list menu, click 'More Actions' and then 'Import…'. A popup will ask you to select a .csv file. Select the one you created with the Address Book application and click the 'Import' button. Google will read the file and voila – your contacts will be part of your Gmail account. This account can in turn run synchronized with your iPhone. 
Share
Categories
Computing Java Web Development

Spring Bean Validation: Error code list for Custom Error Message

In my charge to regain my coding skills, I am using Spring MVC and trying to run it on Google's App Engine.

As with any web application, I have a form which I was looking to validate. Spring appears to be very high on its integration of Hibernate's implementation of a budding Java standard, JSR-303, In essence that means annotating a POJO bean file and then having your Spring MVC Controller (@Controller is the annotation) use another annotation (@Valid) to trigger validation. If errors are found, the form is returned with error messages. Pretty awesome. Yet JSR-303 has a rather big omission: if you have to fields in a form that must be identical – as in the case of password a password confirmation field, you need to write custom code. Luckily, that capability is covered by *the other* Spring-related validation framework – The Spring Modules project's Validation library.

Configuring Spring Modules' validation is covered insanely well by Willie Wheeler. Spring Modules Validation (SMV hereafter) has the ability to compare fields to each other as a validation condition and also apply a validation rule based on prior validation success (look here for table 17.11). Very very cool powerful stuff. 

Where his article needs a bit of help is in how to set up custom error messages. See, SMV detects a validation error, it looks to create an error message that your Spring MVC form will display to the user. The default error messages are intentionally lacking, as you *are* expected to provide your own version for an error. And while the Wheeler article talks about how to set the errors up in a Properties file, he does not (nor is he expected – again thank you) cover all possible validation error codes that are necessary for you to define the error messages. This is why I am writing this post.

So, your custom error message properties file will consist of lines like the following:

SimpleClassName.propertyBeingValidated[validationRuleViolated]=your custom error message

So if you had a class called ApplicationUser with a field called email, your annotated class code will look this:

@Email private String email;

And your error message properties file will have a line like:

ApplicationUser.email[email]=Please enter a valid email address

You need to ensure that your class name (no package needed) is correctly capitalized. What's not clear – and drove me nuts, is what exactly are the error codes you put within the brackets – for example – [email].

Thanks to this incredibly useful post on the SpringFramework discussion boards, the error codes are based on default strings that are embedded in each one of the validation classes inside the org.springmodules.validation.bean.rule package.

To spare you digging through the source, here are the validation rules and the default error code strings associated with them:

Validation Rule Error Code Description
@NotNull [not.null] This rule validates that the validated value is not null.
@NotBlank [not.blank] This rule checks that a string value is not blank (that is, it holds some characters).
@InTheFuture [in.future] This validation rule checks that the validated date/calendar/instant occurs in the future (relative to the time of validation).
@InThePast [in.past] This validation rule checks that the validated date/calendar/instant occurred in the past (relative to the time of validation).Attributes are value that"Specifies the condition expression " and optionally, expressionScope. Defines the evaluation scope of the condition expression. global will define the validated object as the scope, while property will define the property value as the scope. Using the property scope enables the definition of conditions that apply directly on the property value (e.g. "length > 5"). The global scope enables the definition of conditions that apply on other properties of the validated object (e.g. "equals some_other_property")
@Email [email] This rule validates that a string value holds a valid email address.
@Expression [expression] This annotation represents an expression based validation rule. See Table 17.11
@Length [length] This rule checks that the range of a string's length is within specific bounds.See Table 17.13 for extra attributes
@MaxLength [max.length] This rule checks that the range of a string's length is less than or equals a specific upper bound. Must have a max attribute that "Specifies the maximum length the string value can have"
@MinLength [min.length] This rule checks that a string's length is greater than or equals a specific lower bound. Must have a value attribute that "Specifies the minimum length the string value can have"
@NotEmpty [not.empty] This rule checks that a collection/array is not empty (that is, it holds at least one element).
@size [size] This rule checks that the size of a collection/array is within specific bounds. See Table 17.16. Essentially, min and max attributes
@MinSize [min.size] This rule checks that the size of a collection/array is greater than or equals a specific lower bound. Must have a value attribute that "Specifies the minimum size of the collection or array ".
@MaxSize [max.size] This rule checks that a java.lang.Comparable value is within a specific range. Must have a value attribute that "Specifies the maximum size of the collection or array".
@Range [range] This rule checks that the size of a collection/array is less than or equals a specific bound. Must define either a min or a max attributes or both. Specify the lower and upper bounds of the range, respectively.
@Min [range] This rule checks that a java.lang.Comparable value is greater than or equals a specific lower bound. Must define a value attribute that "Specifies the lower bound of the range"
@Max [range] This rule checks that a java.lang.Comparable value is less than or equals a specific upper bound. Must define a value attribute that "Specifies the upper bound of the range"
@RegExp [regexp] This rule checks that a string value matches a specific regular expression. Must define a value attribute that "Specifies the regular expression"
@Expressions [expression] This annotation enables defining multiple @Expression annotations on a property.
@ConditionRef [spring.condition] This rule uses a condition that is defined in the application context to perform the validation check. Must define a value attribute that "Specifies the name of the condition bean as defined in the application context."

Hope this is of help to others.

Share
Share